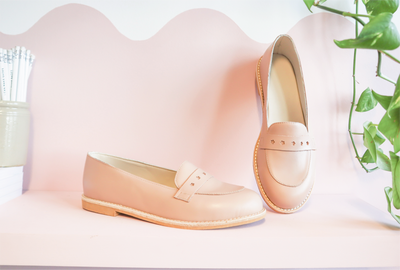
The derby shoe is a super versatile style, bridging the gap between formal and smart casual. It's a shoe which includes numerous possibilities for variations. From toe caps, to back straps, to broguing - the sky is the limit with the derby shoe! 👞
You may be wondering - what's the difference between a derby and an oxford shoe? The answer is that their uppers are constructed differently. Whereas an oxford (or balmoral) has closed lacing, the derby (or blucher) has open lacing meaning that the sides of the shoe have been sewn on top of the vamp as opposed to under. Although oxfords tend to be the traditionally more formal shoe, derbies are more versatile and tend to fit more people.
Read on to discover how to make your own DIY derby shoes from home, using a domestic flatbed sewing machine. This style is suitable for shoemakers of all levels!

To help you get started, we've made a downloadable derby pattern in sizes EU 35 - 44 (that's UK 2 - 11), which you can print at home. Once you've nailed making your own derbies from home, you'll know the fundamentals of lace-up flat shoes, and can totally create oxfords, brogues and wingtips of your own design! ;)
In an effort to make home shoemaking a more accessible craft, we've made this downloadable shoe pattern easily printable from home, and have included a step-by-step closing sequence to help you along the shoemaking and sewing process.
The PDF shoe pattern is available for instant download and prints on sheets of A4 or Letter size paper. All you have to do is print at 100%, cut out the patterns, and tape together any that have been broken up to fit on an A4 page.
What you'll need:
- Upper and lining materials of your choice.
- Matching polyester thread.
- Scissors.
- A domestic flatbed sewing machine, with a denim or leather needle.
- Water-based glue and a safety beveler, which you can find in our Beginners Shoemaking Tool Kit.
- Eyelets (optional).
- Shoelaces.
More about this pattern:
This pattern includes 3 pattern pieces with an optional back strap. All pieces except for the backstrap are the same for the upper and lining. The only difference being you would fold the 5mm allowance on the topline of the upper (optional) and this 5mm will become the trimming allowance on the topline of the lining. If this is your first derby, we recommend going for a raw edge topline.
If you have altered your last for a square/pointed toe or adjusted the width, we recommend adding on some extra lasting allowance to the pattern, to accommodate this build-up.
Step by Step process:
- Trace and cut out the linings and uppers in your chosen material using the same pattern. *Remember to flip the pattern pieces to get left and right feet.*
- Stitch together the back seams of your upper and lining pieces, 5mm in from the edge. Open the seams with a little glue and skive away excess bulk. *These seams are closed seams, so stitch right sides together.*
- If you would like to add the optional backstrap, glue and fold over the 5mm allowance along the backstrap's sides for a folded edge. Glue the back strap along the upper's back seam, carefully lining up the toplines and centering the strap.
- Glue and fold over the 5mm allowance on the toplines of your upper.
-
Apply a little glue along the wrong sides of your upper and lining toplines. Using your centre seam as a reference, match together the upper side panels with the linings and stick the toplines together. *The 5mm trimming allowance on your linings will sit 5mm above the topline of your uppers.*
- Stitch together the topline of the side panels. *Make sure not to stitch the side seams where the pattern curves downwards into the lasting allowance.*
- Trim off your lining's trimming allowance, leaving some at the back seam for an easier lasting process.
- Apply glue to the wrong sides of your tongue, both on the upper and lining pieces. Stick your tongue upper and lining pieces together. *Note that the tongue has a raw edge, so make sure to line up your pieces neatly.*
- Optional: stitch your tongue pieces together. *Make sure to stitch only around your tongue's topline.*
- Cut a 2cm slit in the corners of your side panels' lining pieces, where you ended your stitching from step 6. You'll want to angle your slit at a 45° angle. Do this on both sides of your side panels. *Make sure not to cut into your upper.*
- Apply glue to the right sides of your upper along the 10mm underlay, as indicated on your pattern. Apply glue to the wrong sides of your upper side panels. Stick your side panels to your uppers.
- Stitch your side panels to your vamp pieces, added a few back stitches at the corners of your side panels for extra sturdiness. Pull your threads through to the underside of your upper and double knot.
- Repeat steps 11 and 12 for your lining pieces.
- Using your pattern as a guide, mark with an awl where you need to punch your holes for your eyelets.
- Punch holes out, through both your upper and lining pieces.
- Optional: hammer in your eyelets of choice.
- Lace up your derbies with some shoelaces.
You're now ready to last your uppers! 🎉
To give you some inspo, why not check out our collaboration with artist Just Charlie French, where we created the coolest derbies with leather painted by Charlie.

If you make a pair of handmade derbies of your own, we'd love to see! Send us your pics via Instagram: @icanmake_shoes. I can't wait to see the amazing shoes you make! 💖
learn shoemaking for yourself

The course covers how to make shoes from scratch including heels, flats, boots, sneakers, sandals, and more. The thing that really sets this course apart from others is that it's specifically designed for total beginners and requires very little in the way of tools & equipment, there's even a bonus module on how to start your own shoe brand.